Node BDD Cookie Cutter
Learn how to setup a Behavioral Driven Development pattern in a Node.js project. Using Mocha and NYC, we will setup a watcher that will run unit tests on the fly and produce coverage results when you pre-commitcode using Husky.
TLDR;
You can see the Github, Travis and Coveralls.io output of this cookie cutter in the links below.
- Github - Repository
- Github - Pull Request #1
- Coveralls.io - Coverage Report (Build #11)
- Travis CI - Build Information (Build #11)
Inspired to Test
Recently I have been having fun watching videos by an experienced software developer who goes by the name of Uncle Bob (Steve Martin). I have also been reading Steve’s book “The Clean Coder.” Steve’s writing and talks on Youtube have an entertaining mix of humor and information that I find to be engaging, and enlightening.
I can imagine Steve will rub a lot of people the wrong way; on one hand Steve sounds like a fundamentalist know-it-all preaching about the way things should be done. But I love that about Steve. He’s got the experience and the conviction to make a solid point.
Steve Martin’s video on the “The Three Laws of TDD” is great fun! In this video, you get to watch a man who fanatically practices Test Driven Development, preach his way through the three laws with zeal.
Steve makes many points worthy of reflection, but one of the most interesting was the idea that in practicing Test Driven Development:
~ “The developer will produce algorithms that they would not have thought of making if they had not coded the software line-by-line.”
That is a loaded premise that deserves testing.
My hunch, is that developers think and code in paragraphs, and story-arcs. Perhaps this is because the big-picture has to come ahead of the line-of-code. Our development work is driving towards some predefined feature. We sit down and start creatively writing towards our end goal. After we think we have enough functionality to test, we run the code. As a result, our functionality may work well – for the ways we expect the code to be used. But coding with 100% coverage may cause us to discover solutions we could not have perceived.
And so it goes, that coding your thoughts out in real-time could not only set you back in terms of efficiency, but may also lead you to an entirely different architecture.
The Three Laws of Test Driven Development
What are the three laws of TDD?
- First Law: You may not write production code until you have written a failing unit test.
- Second Law: You may not write more of a unit test than is sufficient to fail, and not compiling is failing.
- Third Law: You may not write more production code than is sufficient to pass the currently failing test.
At first pass, this technique sounds insane. To only ever write the tests first seems like you would paint yourself into a box pretty quickly. But I have been practicing this dogmatically on a test project of moderate complexity: a language parsing engine; and I have not found the method to be nearly as painful as I had expected.
What I found was that development was incredibly slow and boring at first. Though I did notice that the code I had written became structured in a much simpler way than I would usually have attempted. My source was naturally falling into smaller functions with fewer concerns.
When the code-complexity increased a little, the boredom disappeared. I found myself darting back through some of the first tests I had written, to update behaviors as I rounded out the behavior of the parsing engine.
This was all par for the course. I expected these things from my experiences writing tests for other projects. But in being 100% dogmatic about the 3 Laws of TDD, I had two very big and very unexpected “Aha!” moments.
Number & Nature
The first was the number and nature of the bugs I was exposing. I was managing to catch bugs with TDD, that I know I could not have typically found until much later in the project if I had not followed the 3 Laws of TDD. I also found the bugs were smaller and more limited in their scope. The reduced complexity of the bugs made them much quicker to trace and squash.
After getting deeper into the project, I realized I was flying.
The second “Aha!” moment came after a few iterations when I installed the code-coverage tool. To my surprise, I found I had thousands of lines of code, with only two if-else branches statements not covered.
My code was 99% green, out of the box!
Suddenly the effort of coding tests after writing the code looked like a big fat waste of time. And it was all about the complexity.
Code is Like Rope
Imagine you were looping pieces of knotted rope around your arms into a manageable bundle. If you work out the kinks and the knots each time you reach one, you will have a tight bunch, which maintains its shape without much effort.
But imagine if your boss was yelling at you to “get that God damned rope bundled as quickly as possible”, and you just wound that sucker up as fast as you could into an enormous rope-spaghetti. Next time you come to use that rope, you are going to have a few problems.
The rope will not unwind. You will have to untangle one thing here so that you can un-knot another thing there. And then you will have back track on yourself because you didn’t realize that if you untangle one part, you make a knot in another. It then becomes more cost effective to buy a new rope than to spend the time untangling the old one.
In my experience, source-code is like that.
Exactly like that.
TDD vs BDD
The point of this post was to share how I am setting up Node.js projects for Test/Behavior Driven Development. I will explain how I do this in a moment.
But what is BDD?
https://en.wikipedia.org/wiki/Behavior-driven_development
While TDD stands for Test Driven Development, BDD stands for Behavior Driven Development. These two practices are essentially the same practice, but with different nuances. BDD targets domain logic, and uses chained domain specific language, making the tests read more like spoken English.
For example:
const foo = {bar: 123}
expect(foo).to.have.property('bar')
expect(foo.bar).to.be.a('number')
expect(foo.bar).to.equal(123)
I love this expressiveness in the language that Chai allows.
But why test “behaviors” instead of “units”? That’s a great question. What we really want to test in software is something like: “Can my software generate Output X when running Function Y?” The small details of how Function Y produces Output X do not necessarily matter to us, we simply care that we get Output X. The advantage of thinking about tests this way is that when we change the internals of Function Y without having to re-write most of our tests.
This video Test Driven Development vs Behaviour Driven Development may be helpful:
The Node.js BDD Toolchain
The Toolchain I am using for my Node.js projects contain the following tools:
- Mocha - The testing framework.
- Chai - to write tests in BDD syntax.
- Chai as Promised - for testing asynchronous Promises.
- Istanbul - to instrument and test for code coverage.
- Mocha LCov Reporter - to report code coverage for Mocha tests.
- Git-Pre-Commit - to run tests before commits.
- Coveralls - to share code-coverage on Github.
- TravisCI - for testing on Github pull requests.
I am going to take you through the steps to setting most of these up and writing your first couple of asynchronous tests with ES6/ESNext.
Pre-requisites
- Node.js -
v8.4.0 - Yarn -
0.27.5
First lets create the directory structure for our project:
Make the project directory
mkdir node-bdd-cookie-cutterCreate a lib folder for our source code
mkdir libCreate a folder for mock resources
mkdir mock
🙅 DO NOT!
DO NOT create a “test/” directory. We will be keeping out specs (“tests”) next to our code.
Your tree should now look like this:
Now lets start adding our testing packages:
yarn add mocha chai chai-as-promised istanbul mocha-lcov-reporter git-pre-commit coveralls
After our packages are installed, lets initialize our package.json:
npm init
# This utility will walk you through...
# Here are the values I am using:

package name:  # bdd-cookie-cutter
version:  # 1.0.0
description:  # Behavior Driven Testing template for Node.js
entry point:  # lib/index.js
test command:  # mocha
git repository:  # git@github.com/f1lt3r/node-bdd-cookie-cutter.git
keywords:  # bdd, tdd, coverage, promises, chai, istanbul, coveralls, travis, git-pre-commit, lcov
author:  # f1lt3r
license:  # MIT
Great! Now that we have things set up, we can start writing some tests.
Creating The First Tests
We are following BBD principles here, so before we start working on our production code, we need to create a failing test. Open your editor or IDE and start working on the file: lib/my-lib.spec.js.
// Import Chai so we can write nice syntax
const chai = require('chai')

// Import the lib to test
const myLib = require('./myLib')

// Alias expect from Chai (we will use it a lot!)
const expect = chai.expect

// Setup Chai for work with Promises
chai.use(require('chai-as-promised'))

// Allow implicit testing of failed promises
chai.should()
The first thing that our lib needs is a file loader. So lets add a failing test. In the code below, we add a group of tests for file loader in my-lib. Then we add a test to check that our file loader will reject a promise to load a file that does not exist.
describe('my-lib', () => {
        it('should fail to load a test file', () => {
                const filename = '../mock/no-file.txt'

                return myLib.loadfile(filename)
            // Implicit testing of failed promises
                        .should.be.rejected
        })
})
Now we have our first test, lets run it and see what happens. We can do this by running ./mochafrom our current directory.
We can see that our lib does not have a function called loadfileyet, so let us add one. Open the file lib/my-lib.jsand place the following code inside.
// Include File System library (to load files)
const fs = require('fs')

// Create an object for export
const myLib = {}

// Create a public function on the exported object
myLib.loadfile = filename =>
        new Promise((resolve, reject) => {
                fs.readFile(filename, 'utf8', (err, content) => {
                        if (err) {
                                // Reject promise if file can not load
                                return reject(err)
                        }

                        resolve(content)
                })
        })

module.exports = myLib
Now we have something to test, lets run mocha again.
Great, it works! We have followed the TDD principles, creating a test that fails, and then added the minimum necessary code to make the test pass. Lets keep going and write another failing test. This time we will write one that should pass. Add the following code:
// Begin the tests!
describe('my-lib', () => {
    ...

        it('should load a test file "Hello World!"', () => {
                const filename = '../mock/yes-file.txt'

                return myLib.loadfile(filename).then(contents => {
                        expect(contents).to.be.a('string')
                        expect(contents).to.equal('Hello World!\n')
                })
        })
})
Running mocha again we get the following:
All we should have to do to make this test pass, is add the correct file and re-run the tests.
echo Hello World! > ../mock/yes-file.txt
mocha ./
Ta-da!
Now just keep going. Create a failing test, write the code to pass the test, and so on. At the point your code begins to get useful, I hope you experience the same wins that I have.
Npm Testing Setup
So far we have been running our tests using the command mocha ./, but our project would be better served if we could run our tests from an NPM script in our package.jsonfile.
Looking at our package.json file, we can see that our current test command is just mocha.
{
  "scripts": {
    "test": "mocha"
  }
}
So if we use the command npm testor yarn testfrom the CLI, we can see Mocha get kicked off by Node.js.
Because we have set up our test alongside our code Mocha does not know where to look. It is looking for the directory called “test”.
We should see an error like this:
Warning: “Could not find any test files matching pattern: test”
Let’s update the package.jsonfile so that Mocha has something to work with.
{
  "scripts": {
    "test": "mocha ./lib/**/*.spec.js"
  }
}
This should make Mocha look inside all sub directories of ./libto see if there are an *spec.jsfiles. If you save the JSON file and re-run npm test, you should get the following output:
Great, mocha found the tests! But…
Unfortunately our second test is failing. This is because we were running Mocha from the ./libdirectory previously. The mock file ../mock/yes-file.txtwas being opened relative to where the mochacommand was run.
Note: The first test does not fail because we are testing that a file can not be loaded.
Lets update our code in to handle the path; at the top of ./lib/my-lib.js:
const path = require('path')
And in your last test:
it('should load a test file "Hello World!"', () => {
        const filename = path.join(__dirname, '../mock/yes-file.txt')

        return myLib.loadfile(filename).then(contents => {
                expect(contents).to.be.a('string')
                expect(contents).to.equal('Hello World!\n')
        })
})
Lets run tests again:
npm test
Success!
Our relative directory is now handled in relation to the __dirname. This value __dirnameis the directory that the current JavaScript file lives in.
Now we can run the same tests from the package level with yarn test, as well as from the directory level with ./mocha <file>. This turns out to be very useful.
Symlinking Our App
While we are talking about directories we should talk about symlinking. I find that the practice of symlinking the package directory into the ./node_modulesdirectory allows us to simplify our imports.
Instead of requiring scripts relative to our current JavaScript file we can require scripts relative to the directory that package.jsonlives in. So instead of:
const myModule = require('../../../../lib/myModule')
We can do this:
const myModule = require('app/lib/myModule')
Much cleaner!
We should add our symlink creation to our package.jsonscripts, so that any user checking out our module, will have things set up the right way. Add the following two lines to your package.jsonfile:
{
  "scripts": {
    "test": "mocha ./lib/**/*.spec.js",
    "preinstall": "rm -rf node_modules/app || true",
    "postinstall": "ln -s ../ node_modules/app"
  }
}
When you run npm installor yarn installnow, a symbolic link will be created inside of your ./node_modulesdirectory. This allows you to link to files using Node’s recursive require architecture.
If we lsthe ./node_modules/appdirectory, we can see that it links back to the directory containing our package.jsonfile and our ./liband ./mockdirectories.
Please note: you may have to handle this differently for Windows. In which case an extenal script in the ./bindirectory may be more appropriate. For the purpose of this tutorial, we are going to assume this code will never be run on Windows.
Now lets update our code to use the symbolically linked directory. At the top of our file ./lib/my-lib.spec.jsmake these changes:
// Import the lib to test
- const myLib = require('./my-lib')
+ const myLib = require('app/lib/my-lib')
That’s it for sym-linking. We can now require files relative to the package.jsonfile rather than the file in which we are using the require()statement.
Setting Up Code Coverage
Another important part of Test Driven Development is Code Coverage. We want to know that 100% of our code is covered by our tests. This does not mean that there are no bugs in our code, but it does mean that it is much harder to break the code, or introduce new bugs without noticing.
We installed the Node.js packages required for Code Coverage back in a previous step, so here we just have to implement them in our package.jsonfile.
Add the following long coverline to your package.jsonfile:
{
  "scripts": {
    "test": "mocha ./lib/**/*.spec.js",
    "preinstall": "rm -rf node_modules/app || true",
    "postinstall": "ln -s ../ node_modules/app",
    "cover": "./node_modules/istanbul/lib/cli.js cover ./node_modules/.bin/_mocha ./lib/*.js ./lib/**/*.js && echo \"View report: coverage/lcov-report/index.html\""
  }
}
That new line is comfusing! So what does the line do exactly?
Here’s a quick breakdown:
Istanbul "Cover" <mocha-path> <production-code-path> && echo $HTMLReportPath"
Stepwise:
- Run the Instabul
Covercommand - Pass the path to Mocha
- Provide paths to spec files
- Echo the report HTML output when done
But before we run the coverage command, we are want to add the .istanbul.ymlfile to our package root. This will help us define what not to test, and how the reporting should be done:
verbose: true
instrumentation:
    # Production Code Root
    root: ./lib

    # Files to test
    extensions:
        - .js

    # Files NOT to test
    # (We do not want our spec files showing up in the coverage report!)
    default-excludes: true
    excludes: ["*.spec.js", "**/*.spec.js"]
    include-all-sources: true

reporting:
    print: both
    reports:
        - lcov
Your directory structure should now look something like this, (notice the .istanbul.ymlfile at the top:
Ok good!
Lets run coverage and see what happens…
npm run cover
Fantastic!
We can see from the coverage output that our coverage is at 100%. And if we click on the HTML link, we can inspect the cover in the Web Browser. The table of contents looks like this:
And we can drill down further by clicking on the dirctories and files:
Note: all your coverage files are kept in the ./coveragedirectory.
Pre-Commit Testing
Practicing Test Driven Development is a great way to squash bugs early. But did you know that you can keep the majority of bugs from every getting your code base in the first place? It’s true. You can use Git’s “Pre-Commit” hook to run tests every time you try to commit.
git commit -m "I fixed all the things!"
# ...tests kick off here
If your tests fail, the offending code never makes it into the history of your repository. It’s worth thing about that for a minute.
If your tests pass, your working code is immortalized in the code-base. In the life-cycle of a project, good reasons arise to checkout code from a previous commit: perhaps you will need to diverge the code-base from a previous point in history, or to copy over some pre-existing features that were discarded.
Wouldn’t it be great if you knew that at any point you checked out that code-base, that you could be sure you were checking out “working code”? And wouldn’t it be great to know that the code had 100% coverage so that if you could tweak the feature to sit alongside current changes without side-effects? I think so.
So let’s install the Node.js package git-pre-committo handle this for us:
yarn add git-pre-commit
We can now see two things added to our .git/hooksdirectory:
pre-commit-utilsdirectorypre-commit.jsfile
Fortunately, we can interact with our Git Pre-Commit Hook by adding commands to scriptsin our package.jsonfile. Update the testand precommitscripts like so:
{
"scripts": {
    "test": "mocha ./lib/**/*.spec.js && yarn run cover",
    "precommit": "yarn test"
  }
}
We have added && yarn run coverto the testscript so that code-coverage is automatically run after testing. Then we also added yarn testto the precommitscript, which will kick off both tests and coverage every time you try to commit.
Ok, lets make a bug to test this out!
In your ./lib/my-lib.jsfile, add some bogus data to the return content.
// Create a public function on the exported object
myLib.loadfile = filename =>
    ...
                        resolve(content + 'foobar')
When adding and trying to commit changes:
Super! The commit failed. Our nasty bug got Git-blocked before it could spread across the web. Let’s double check by looking at the git log.
Phew!
Nothing bad was added to our commit history.
Running Tests in CI
With the code so far, we can engage in test-driven development from our local machine. But inevitably we will be sharing our code, and people will create Pull Requests, asking you to merge their fixes and updates. But you can not be certain that the developer creating the Pull Requests has setup their environment correctly and run the tests.
No worries.
We can force each new pull request to have tests run automatically in the cloud by using Travis-CI and Github. Assuming you already have a Travis-CI and Github account, you can follow these steps.
Enable Your Repo in Travis
Select Travis-CI Integration in Github Settings
Add a Travis YML File to your Repo
In the root of you repository, (alongside
package.json), add a file called.travis.ymland insert the following contents:sudo: false language: node_js node_js: - "7" install: - "yarn install" test: - "yarn test"Commit this file to your repository and push to Github. Travis-CI should now have what it needs to run your tests and coverage in the cloud. Tests will be run and coverage will be generated every time that someone creates a pull-request to merge into your code-base.
To test this, I did the following in the CLI:
Checked our a new branch
git checkout -b changesI added an arbitrary change to a file (a line-break)
echo "\n" >> README.mdI pushed files to Github
 git add -A
 git push --set-upstream origin changes
Now when I create a Pull Request in Github, I can see that my tests have run and passed in Travis-CI:
Building Public Confidence in Your Code
So all incoming Pull Requests will now run the gauntlet of tests you created, as well as any tests that the collaborator adds. Passing this test bar raises confidence that the new code being committed will integrate well. And hopefully the act of having any “bar” there at all will help weed out the wrong kind of commits and the wrong kind of collaborators.
Lets take a quick look at what happened on Travis:
☝🧐 In this picture
…we can see that Mocha tests and Istanbul coverage ran in Travis CI, just like they did on our local machine.
Great! Things are adding up.
We have a system locked down that can be used to practice Behavior Driven Development, we have a way of checking our coverage, we can make sure any incoming production code pass tests before being accepted; but we do not have any way of sharing the status of our coverage with outside developers, yet.
Coverage Reports in CI
Sharing coverage results with outside developers is important. Your code-coverage stats allow a developer to know several things:
- This is not spit-ball spaghetti code. The code that the collaborator checks out has been cared for.
- If the outside developer commits changes to the new code, they will have a higher confidence that they will not introduce new bugs and in turn, a higher confidence that their changes will be well received, which should be an encouragement to the developer that their submissions are not a waste of their time.
To set up coverage reports, we will use Coveralls.io. Assuming you have already signed up for a Coveralls.io account, use the following steps:
Flip the switch on your repo
Copy your repo token
Click on the “Details” button. This should bring you to a screen containing your Coveralls
Repo Token. Copy this token and create the following.coveralls.ymlfile next to yourpackage.jsonfile:In your
.coveralls.ymlfile, add your token:repo_token: <your-token-here>This will allow you to run coverage from your local machine only. This repo token should not be shared publicly, so make sure you update your
.gitignorefile so your token does not get committed:Update Git Ignore File
 # Coveralls
 .coveralls.yml
Add a Coveralls Script to Package.json
Now lets add a
coverallsscript to ourpackage.jsonfile:{ "scripts": { "coveralls": "yarn run cover && cat ./coverage/lcov.info | ./node_modules/.bin/coveralls -v" } }This script will run your coverage, and pass the response to the Coveralls package in your
./node_modulesdirectory, which will push the updated coverage reports to the coveralls server where they can be seen publicly.Add Coveralls Script to Travis
Finally, add the following line to your
.travis.ymlfile.after_success: - npm run coverallsThis will trigger the npm coveralls script.
If we commit these changes and create a pull request, we can see what that Coveralls is now reporting your Coverage at 100%!
Add Coveralls Badge to Readme.md File
Select the Markdown embed code from the page:
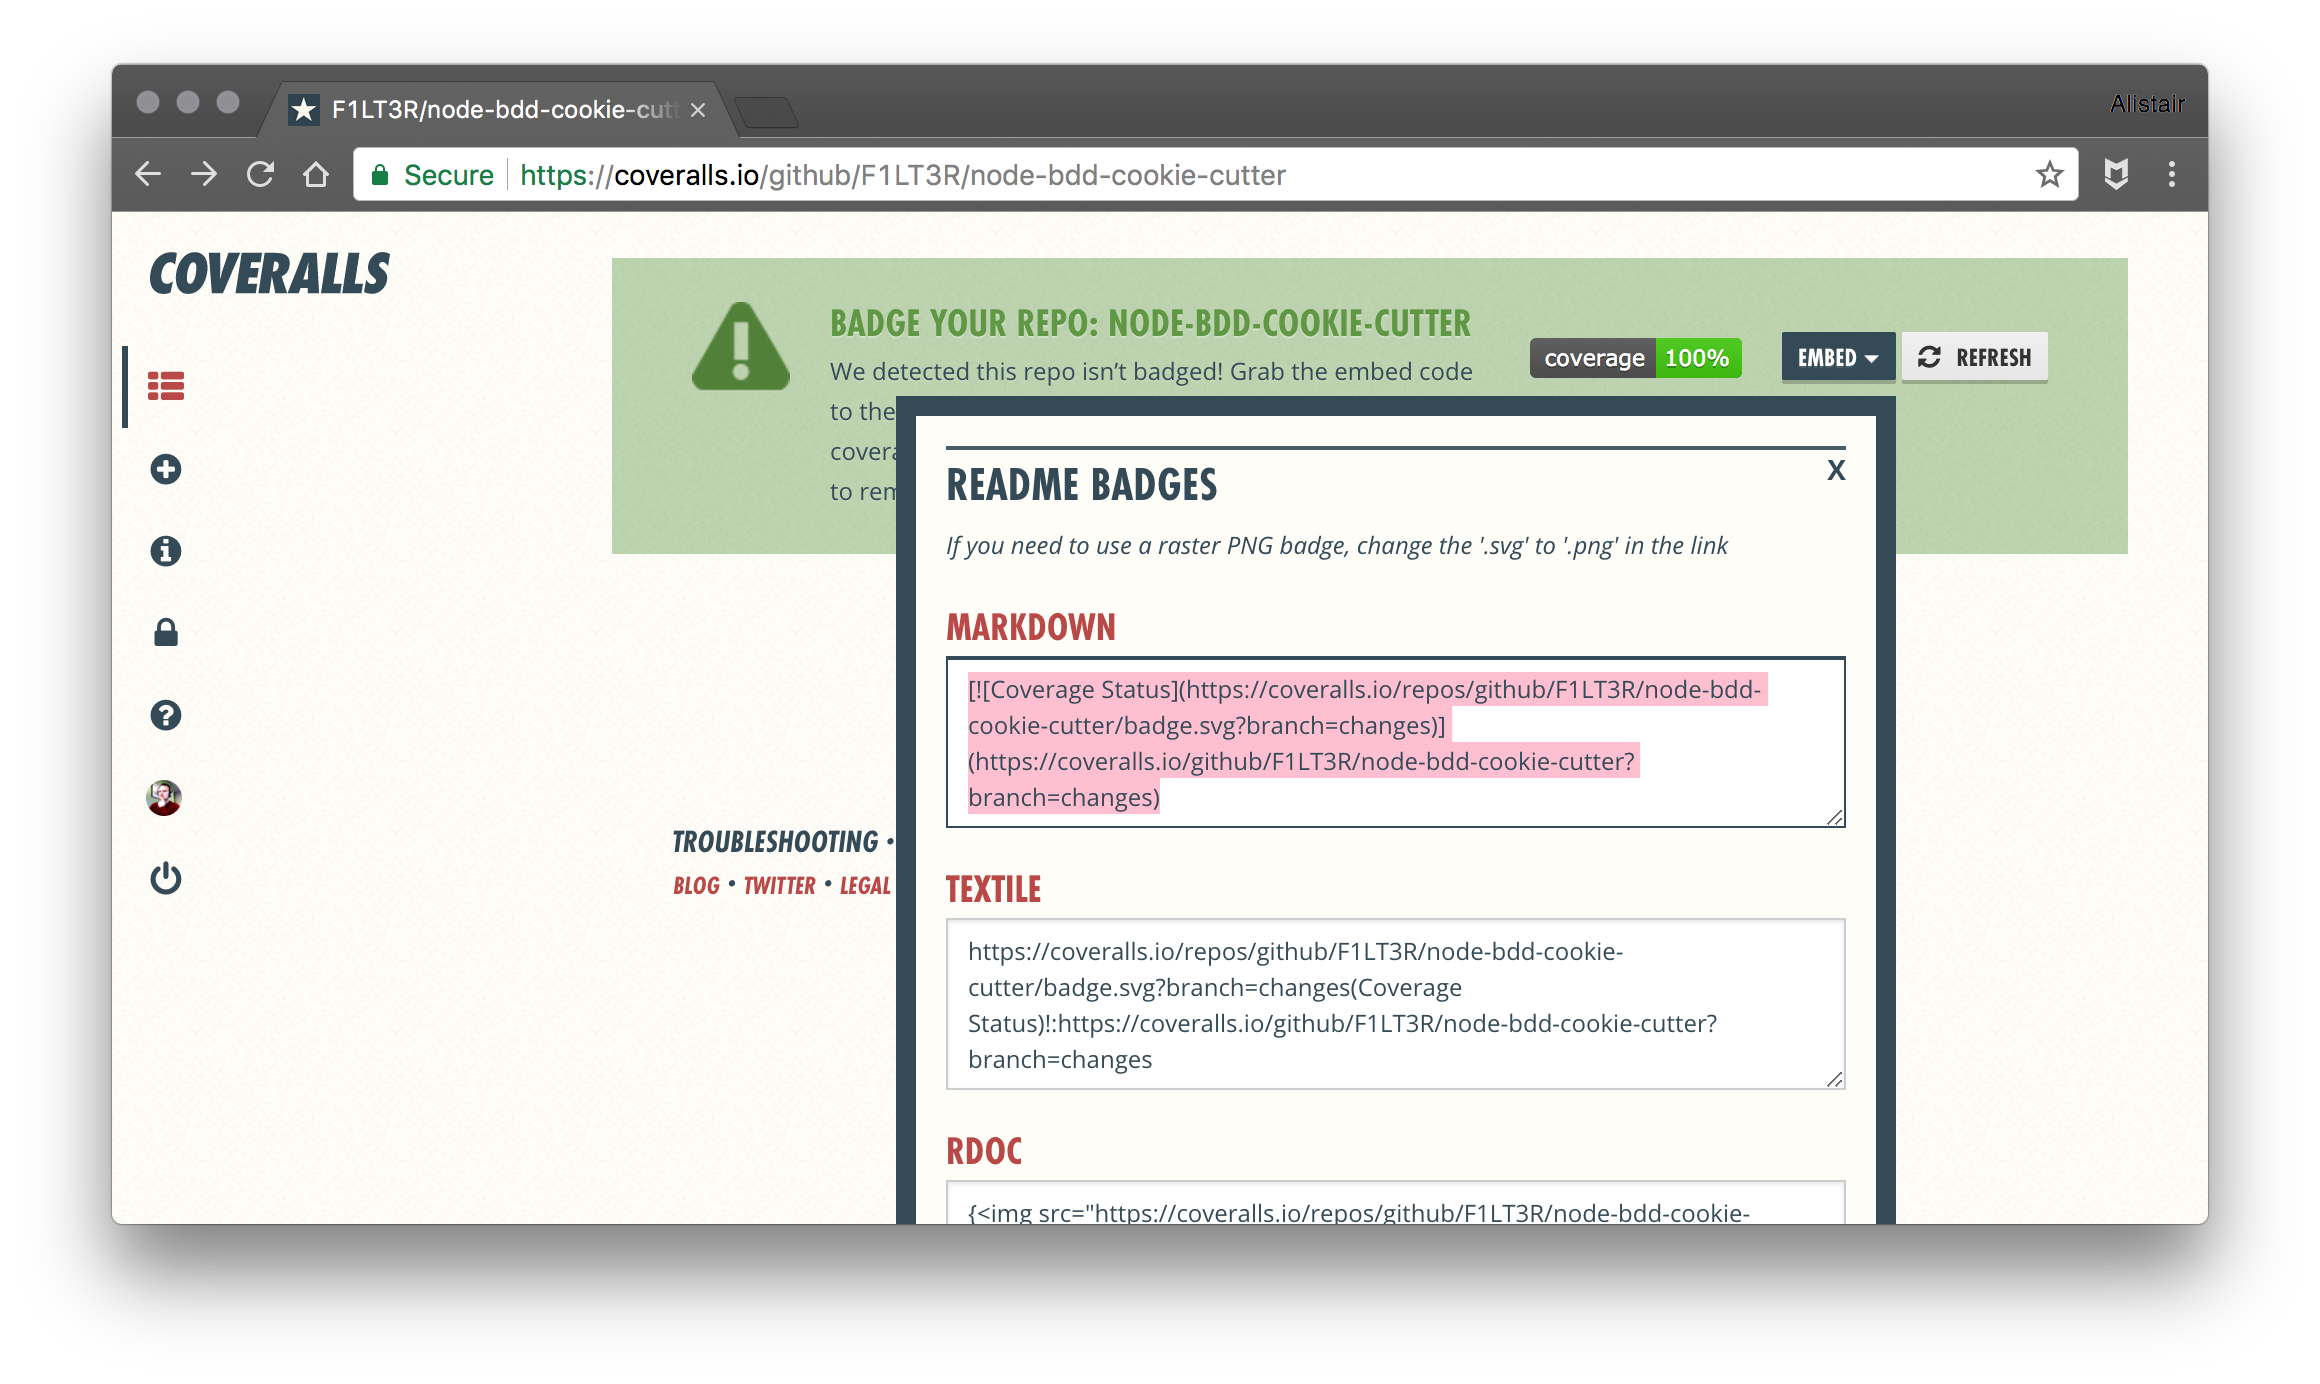
And copy it to your repo’s
README.mdfile.# node-bdd-cookie-cutter Cookie Cutter Repo for Behavior Driven Testing in Node.js with Promises [](https://coveralls.io/github/F1LT3R/node-bdd-cookie-cutter?branch=changes)
Now when we commit and push changes, the Code Coverage Badge is automatically updated to represent the most recent results, displaying them in your README.mdfile on Github.
Conclusion
Congratulations!
You can now use Behavior Driven Development in Node.js to create production code, and reap the many benefits of TDD along the way. You can check that any incoming code passes tests before you merge it, and attract new contributors to your project with your coverage badge.
I would like to say a big thank you to David Ernst for the blog post he wrote on this subject, which was a big help getting some of this proceedure figured out at the start of the year.
If you would like to look at the code from this blog post, I have added everything here on GitHub: node-bdd-cookie-cutter.
Thoughts, comments, ideas? Let me know!
       ___ _ _  ____________
 ___  | __/ | _   ___   _ \
/___/ | _|| | __| | _ \   /
      |_| |_|____|_||___/_|_\